Have you ever taken a screenshot on steam while playing the games? Then, you might be wondering where the screenshots getting stored, right? Don’t worry; Technographx will let you know where to access the steam screenshot folder in this post. So, continue reading the post.
But, before that, let us have a look at what Steam is. For those of you not knowing about Steam or having very less idea about it, let us tell you that it is a software for video games, owned by Valve. It enables user with the installation and auto-updating of video games. It provides cloud saving facilities and in-game voicing and chats functionality. This software started in the year 2010 and it offers Linux, Windows and Mac games today.

You are able to take and share the screenshots with Steam very easily and quickly. The steam cloud storage is 1 GB in size. It is enough to keep pictures of your best gaming memories. Take a snap of the highest record that you have achieved in the game and share it with your friends or just keep it in the storage on your pc.
Now, let us have a look at where are the steam screenshots getting saved. Just follow the methods for accessing the steam screenshot folder and you will get a complete idea.
Method 1
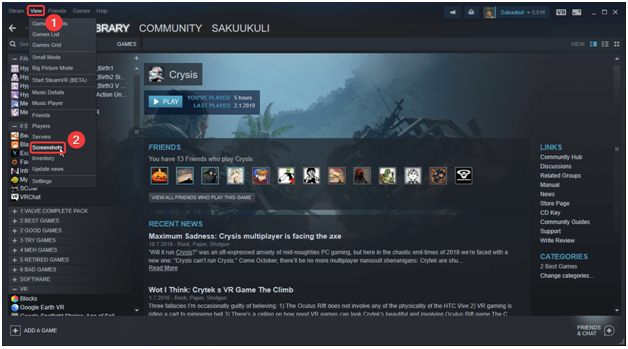
- Just open Steam and click on View >> Screenshot.
- This will open a new window. Click on Show on Disk and the screenshot folder will open. That’s it, isn’t it the best method to go for!
Method 2
Open the screenshot folder by browsing the below location.
- You have to open File Explorer and then open C:\Programfiles (x86) > Steam > userdata > (yourSteamID) > 760 > remote > (app ID) > screenshots.
Just follow the above path where the steam screenshots are stored.
Method 3
If you don’t want to browse the location again and again and also don’t want to open the screenshot folder by first opening the steam software then follow these steps.
- First, Open File Explorer and then open C:\Programfiles (x86) > Steam > userdata > (yourSteamID) > 760 > remote > (app ID)
- Now, you will see a folder named “Screenshots”. Just right click on the folder and then click “send to”-> then desktop. This will create a shortcut on the desktop and now you will be able to open the folder directly from the desktop without opening the steam software.

How To Take A Screenshot While Gaming?
You might have got this question while playing this game many times so if you don’t know how to do it then let us tell you.
You have to just press the default key binding of F12 (by default) for taking the screenshot, that’s it. Now, you can publish the photo on the steam community or on social media.
How To Save Screenshots With Steam?
When you press F12 key for taking the screenshot, the screenshot will be taken and automatically saved on your PC. You can also upload your screenshot while playing the game, the new Screenshot Manager system allows this functionality. For customizing the screenshot hotkey, just visit the In-Game section of Steam Settings.
Change the Screenshot Folder Location of Steam

Do you want to change the screenshot folder location of steam? Then, just follow the below given steps for doing that.
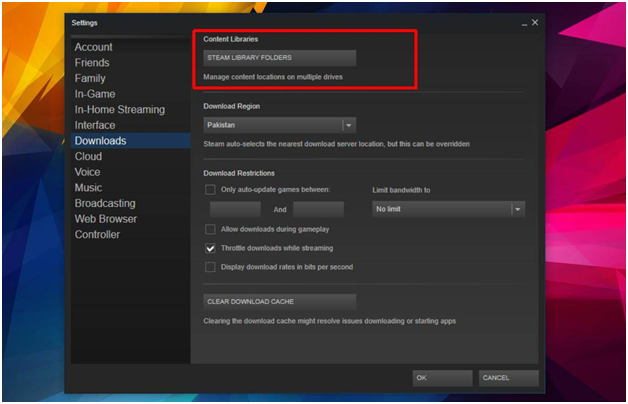
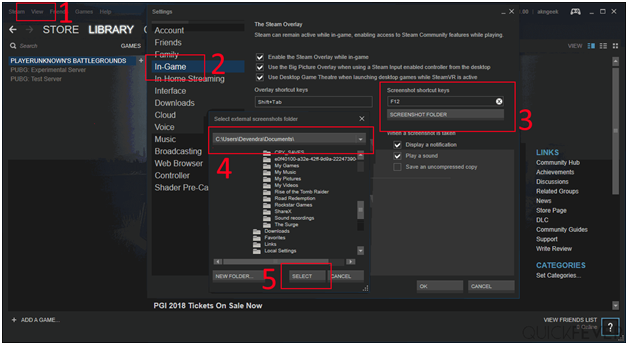
- You have to Open Steam Software >> then click on “View” >> then “Settings”
- This will open a new window. Now, click on “In-Game”.
- You will see an option “Screenshot Folder” below the screenshot shortcut key option.
- You have to click on “Screenshot Folder” and create a new folder or select an existing folder where you want to save the photos. Now, click on “Select” and Finally click on “Ok”. That’s it, the folder location will get changed to your desired location now.
Many users have complained that their Steam overlay is not opening. Follow the below mentioned steps.
- First of all, open the System Client and
- Reach to the location of Steam>Settings/Preferences>In-game tab. Now, check the box which is next to Enable the system Overlay while In-game.
- Change the overlay keys to the desired keys you want from the below box.
So, here was a detailed explanation of how to access the steam screenshot folder. Just follow the different methods provided and you will get to the folder.


