If you’re looking for a video editing service to quickly and easily crop videos for free to send to friends or upload to social media, Flixier is a perfect service to easy achieve this.
Flixier is a powerful online video cropper and editor.
This is how to crop videos online for free with Flixier:

Using Flixier, you can easily import your target video and crop it straight through your web browser.
You can effortlessly import and crop your target video with Flixier right from your web browser. There’s no need to purchase any specialist computer hardware or even download and install anything.
The traditional way of cropping video would be using expensive and resource-intensive video editing programs like Adobe Premiere Pro or Final Cut Pro X. However, these programs are difficult to use, and users with slow computers may experience slowdowns, crashes, and lengthy render times.
That’s where Flixier comes in. Using the power of cloud computing, Flixier offers a smooth and faster online video editing environment no matter what device you use.
Here’s how you can use Flixier to crop your videos into your chosen aspect ratios and share them directly to social media.
Step 1: Create a Flixier Account
Flixier is free to try out if you don’t mind having watermarks on your video. With this free tier, you can export up to 10 minutes of video per month and you’re limited to 720p. It will cost $10 a month to upgrade to the Creator tier and get 300 minutes per month and HD 1080p with no watermarks.
Once you’ve created your account and signed up for your chosen tier, head over to editor.flixier.com.
Step 2: Create a Project
Next, you’ll need to create a project. Click Create Project and choose an aspect ratio. Don’t worry; we can change this later if we need to.
Step 3: Import your Target Video
You should now be in the main timeline of Flixier. Find a tab labelled Personal Library and hit the Import Button. Here you can select a media file to crop.

For this demonstration, I’m going to import from YouTube. Flixier will take a YouTube URL and instantly insert the video into the timeline. You can upload files from your device, Google Drive or even from Twitch and Zoom.
Step 4: Trim your video down to the size and section you want
This is optional, and if you want you can keep the video as is. However, most people who want to crop their video are usually posting snippets on social media for a different aspect ratio. These people may benefit from trimming the video to fit social media limits.
To trim your video, hover over the end of the clip and drag it towards the start of the timeline to adjust the clip length. Alternatively, you can place your play head at a certain point by clicking on the timeline (where the seconds are marked) and then clicking Cut to splice the video clip.
Step 5: Change the Aspect Ratio
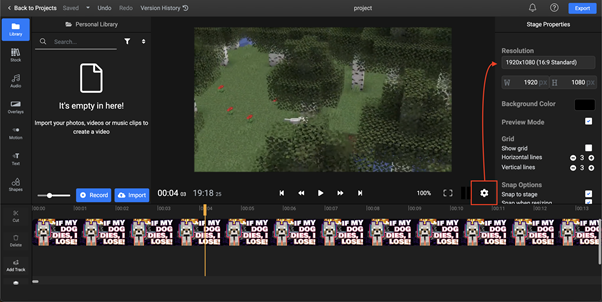
To crop the video and change the aspect ratio, you want to select the cog wheel underneath the video preview canvas.
Then, a pane called Stage Properties will appear.

Select your Resolution drop-down and pick your desired aspect ratio. We find that 9:16 works well for mobile applications like Instagram Stories.
If you can’t find you desired aspect ratio, you can enter a custom resolution.
To re-position your video clip, click on the video in the video preview canvas and drag it to adjust placement. It’s that simple.
Step 6: Export
Then, once you’ve cropped and trimmed your video to perfection, you can go ahead and hit Export in the top-right of the window.
You can export this video to download to your hard drive or even upload directly to YouTube, Vimeo, or Facebook straight from the Export screen.
Head to https://flixier.com/tools/how-to-crop-a-video to crop videos online for free.

