Transparency is one of the most serious trends gaining prevalence lately in the web design business. This is largely due to the use and popularity of large images. With the help of transparency, the text can pop out on an otherwise busy image.
Here is a simple and quick tutorial that shows how a stylish transparent label can be made in Photoshop. While we have taken white as the lead example, you can as easily get it done in black or any other color of your choice.
Step 1
Open the image that you intend to work with and make all post-production alterations necessary at this very point. The changes usually required involve adjusting the color contrasts and merging the image layers so that you have only one image layer. This layer should be duplicated.
Step 2
Pick the Type Tool and a font of your choice. Something stylish and sharp should be the preferred option. The Anti-aliasing option should be set down to Sharp and the size kept to 140pt. Color is not of paramount importance, only ensure that you are using something that is in contrast to the color of your image.
Type in the text and position it precisely where you would want it to appear.

Step 3
Below the text layer, set up a new layer and rename it as rectangle. Pick the Rounded Rectangle tool from the Toolbar and change the foreground color to white with a radius of 30px. Drag the rectangle so that it covers your text and adjust the margins according to your needs. Don’t keep the fill of this layer at any more than 48% else the label will lose its transparency.

Step 4
With the Control key pressed down, click on the text thumbnail in the layers palette for selecting the pixels. Set the rectangle layer to active and use the Ctrl+J shortcut to copy this selection on to a new layer. This layer can be renamed as white text and should be above the rectangular layer but below the text layer.
In the same manner you should select the text. Ensure the rectangle layer is set to active before hitting the delete key. Any immediate results will not be visible for the text is still visible and covering all that you are doing. Upon turning off the visibility of this text layer the rectangle should look complete and leave you with a rectangle with hollow text.
Set all visibilities back to on.
Step 5
Add the layer styles that will create the necessary transparency effects. Set the text layer to active and reduce the fill down to 0%.
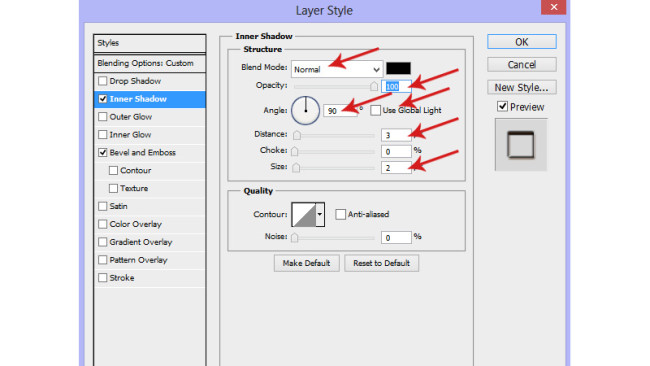
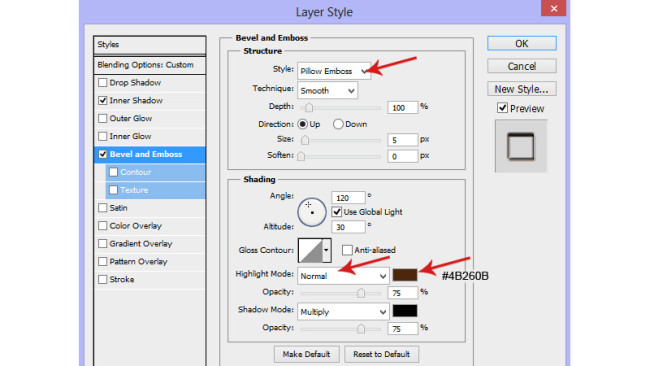
Apply the Bevel and Emboss and Inner Shadow settings as shown in the following image for this layer.


Step 6
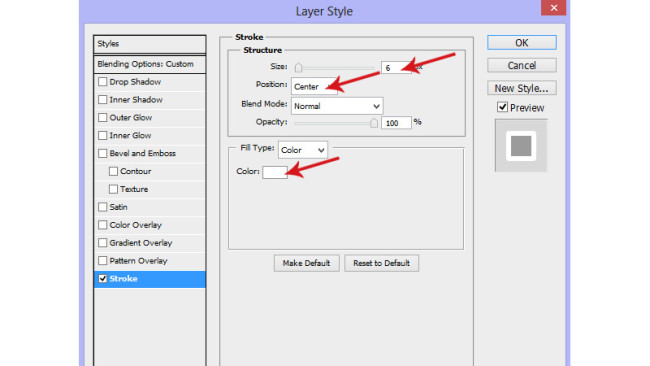
Set the white text layer to active and reduce the opacity down to 28%. Take the rounded rectangle layer and set it to active. The fill should be reduced to 48%. The following stroke settings should be applicable.

Step 7
Once again hold down the Ctrl button and click the thumbnails along the rectangle layer for selecting the pixels. Set the background copy layer to active and add a Gaussian Blur of around 3.8px.


And this signals the end of your label creation process! Hopefully this tutorial will come in handy when you create labels for your next project.


Nice tutorial for learning Create Elegant Transparent Labels for Website Images using adobe photoshop.
I used Photoshop for creating elegant design for websites images but never be able to create a transparent labels for website images design and felt it so complex.Your this tutorial helped me lot.Now ,I can Create Transparent Label images.